
Creating Your First Custom SQL Tools for MCP
The Oracle Cloud Infrastructure (OCI) Database Tools Model Context Protocol (MCP) server is unique in terms of capabilities and security. It allows administrators and database developers to create managed servers without any additional infrastructure or deployment required.
The server supports structured query language (SQL) tools with result-set bearing statements as well as other statement types such as PL/SQL blocks. The server respects your database security and it can be integrated with OCI Identity and Access Management (IAM) for fine-grained access control.
Here is a bit of vocabulary for what you will see below:
- Toolsets are, not surprisingly, sets of tools that come in one of three flavors, namely: Custom, Built-in, and Customizable Reporting.
- Tools contain the SQL logic bundled up with a tool name, description, parameters (optional) and in the case of customizable reporting, some response shape.
You can think of tools as the backend logic of an API endpoint.
Some tools are pre-defined and some are designed with flexibility in mind. Except for the pre-built tools, custom code and configuration will be provided by you, the developer or MCP administrator.
In this post I will cover “Custom SQL tools” to get you up to speed. However, it might be useful to set the stage for why we are building such MCP tools in the first place.
A Primer on MCP
If you already know what MCP is, what APIs are, and why you might use them, you can safely skip ahead. This is background for those that might be new to the topic of MCP.
In the cloud, we define APIs for distributed systems to collaborate via well-defined contracts. Here is an over-simplified example without all the authentication, authorization, and boilerplate.
MCP Client -----> request: get_greeting(...) -----> MCP Server
   ... (server processes the request as needed)
MCP Client <----- response: format_greeting(...) <----- MCP Server
   ... (client processes the response as needed)
In this example, a client asks for the server to run the get_greeting tool and the server dutifully responds.
Depending on the protocol, API endpoints are usually executed as a binary exchange of information over a network (such as in gRPC) or an HTTP-based protocol (such as in REST). Another approach for such collaboration is a protocol known as JSON-RPC.
What all of these protocols have in common is that some tool, system, or process (i.e. the “client”) sends requests to a remote process (i.e. the “server”). When a server is ready to respond to a request in some way, it sends back a response to the client.
MCP tools are not a protocol or API specification unto themselves, but they do represent a similarly well-specified contract built on top of JSON-RPC. When we build an MCP server and define tools within, we are essentially creating an API that some client (i.e. the language model) will use to send specific messages, specific parameters (if applicable) and to receive responses.
With MCP, the “client” is typically an artificial intelligence (AI) harness of some kind. AI chatbots, coding agents, etc. all fall into this category. The MCP server understands how to handle MCP requests and how to respond to clients in an MCP-compliant way.
That is all we need to understand about MCP for the scope of this post. You can go deeper into JSON-RPC and the MCP specification for additional details if you are curious:
Prerequisites
Creating a new Database Tools MCP server from scratch is out of scope for this post but you can find some helpful resources in this tutorial to get started. You can also check out these blog posts by my colleagues that walk through creating an MCP server using the OCI CLI. Simon shows how to create an MCP server that works with always-free accounts and Nikhlesh shows a slightly more advanced setup that uses private networks.
- From Ad Hoc SQL to Governed AI Tools by Simon Vaillancourt
- Create a Private Managed Database Tools MCP Server in OCI by Nikhlesh Agrawal
At a high-level, you will need:
- An Oracle Database accessible from your OCI tenancy
- A vault with a master encryption key and relevant secrets for a database user (if using password-based database authentication)
- A valid Database Tools connection
- An IDCS domain (always-free is fine for this tutorial)
- A Database Tools MCP server
- An AI client such as Claude, Codex, Cline, etc. with your MCP server configured
- IAM policies to allow developers or administrators to update the MCP server and to manage toolsets in a compartment.
All of this and more is covered as part of the tutorial linked above.
A colleague also wrote a nice overview of the OCI Database Tools service. If you are new to OCI or Database Tools, this post is a great place to get caught up:
- From SQL Worksheet to Agentic AI: The Evolution of OCI Database Tools by Francois Robert
Now onward to get started with Custom SQL tools!
Creating your first custom SQL tool
First, you will need to open your MCP server in the OCI console. You may also define your toolsets using the OCI CLI, SDK, or the Terraform provider for OCI but I will only show the OCI console in this post. Once you have the server open, click on “Toolsets” > “Create MCP toolset”.
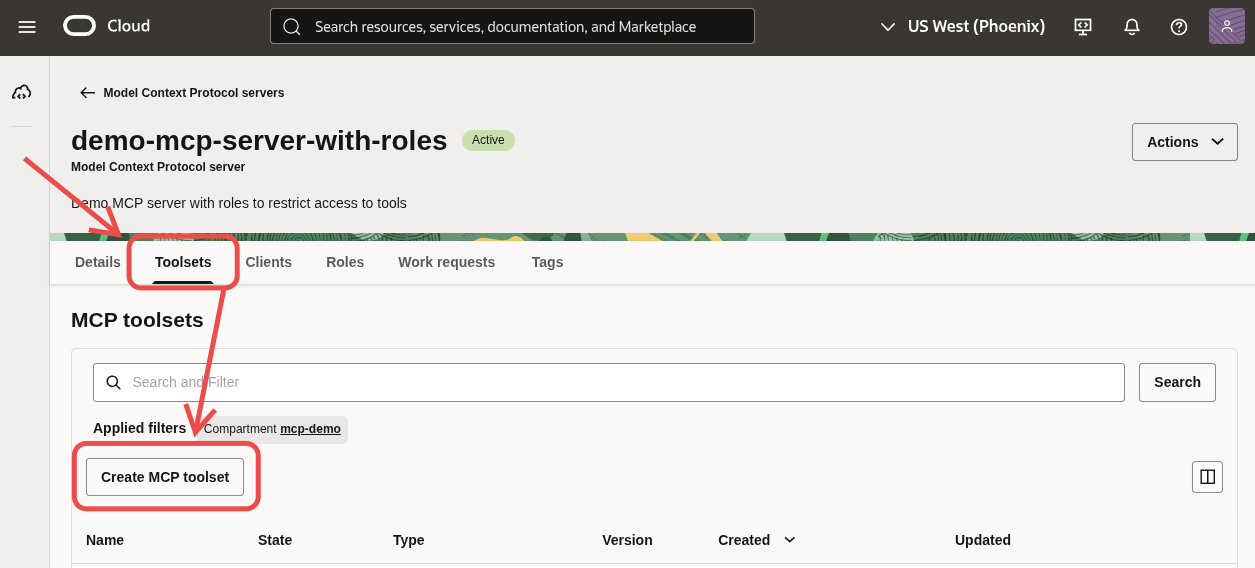 Example of creating a new MCP toolset in the OCI console.
From there you can give the toolset a display name and a description. Make sure you pick the type as “Custom SQL tool” before moving on.
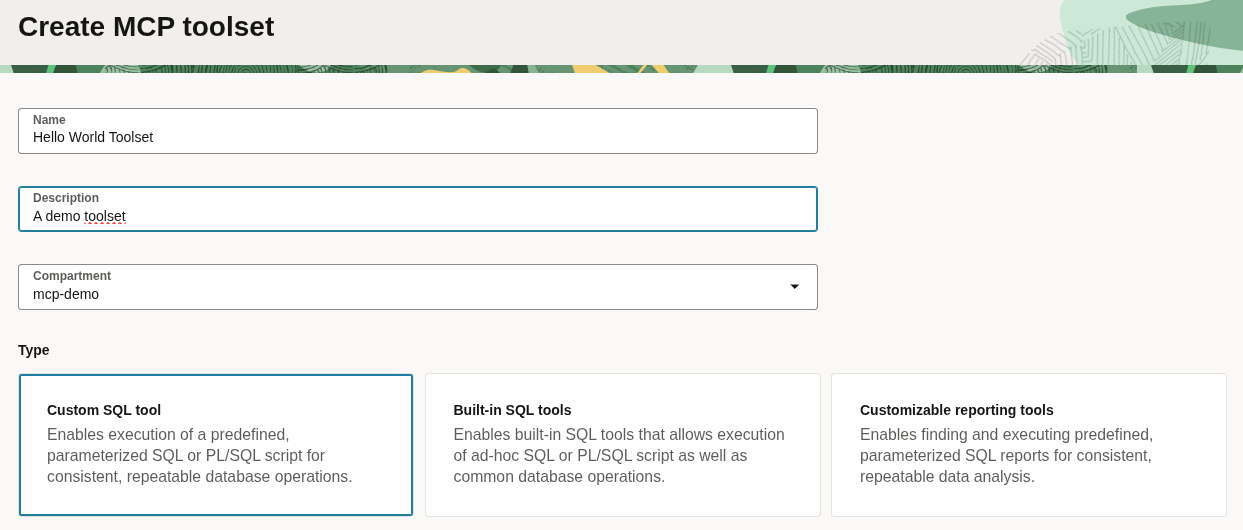 Example of selecting “Custom SQL tool” and entering the name and description for a toolset.
Below that you have some data entry to do. You need to provide the following:
- Select the default execution type:
Synchronous - Enter a tool name:
get_greeting(letters, numbers and underscore only here) - Enter a tool description:
This tool returns a simple greeting to the caller just to say hello. - Select the IDCS roles that should be able to run this tool (I chose all MCP roles for this example)
Note: these fields are important because they give the LLM some additional context when deciding what tool from the MCP server should be used for a given task. You should keep the name short but meaningful and supply a description that clearly describes what type of task the tool should be used to perform.
Finally, add the SQL source for the tool. In this case, we will return a result-set with a single row and column that greets the user.
select 'Hello, World!' as GREETING from dual;
Example custom SQL tool with query.
We will come back to Variables shortly. Let’s get this simple example working first before we move on to more complex tools.
With this in place I can fire up my LLM front-end and I should see the newly created custom SQL tool in the MCP clients context after the MCP client starts up the server and connects.
 Example of an LLM client showing the custom tool name.
Now let’s test this out to see what the LLM does and how it responds. In my coding agent I sent the following prompt:
send me a greeting!
LLMs and their front-end clients are non-deterministic in nature so you might need to play around with the prompt a little to get it to behave. On less capable models you might even need to say something like "use the get_greeting tool" explicitly, or something similar.
The agent received my request and spun some digital wheels for a moment, calculated that I wanted it to use the MCP tool registered via the MCP server, and then sent a request to the remote MCP server to have it execute the tool called get_greeting.
❯ send me a greeting!

● Calling the greeting tool now.

  Called dbtools...

● Hello, World! from the dbtools MCP server!
...
As MCP tool designers, it is important to keep in mind that some of the metadata you enter in the toolset dialogue is fed back to an LLM to clarify the intent and parameter expectations of each tool we create. If you give the LLM more contextually meaningful descriptions for tools and their arguments, you should get better results during inference.
Enhance the custom SQL tool
Now that we have a proof of concept in place, let’s take it one step further to define a variable that this tool will accept. The parameter will be named, typed, and it will have some description too.
Open the Hello World Toolset created before and then click on Actions > Edit and then modify the SQL source. This time we will add a named bind parameter to the query.
select 'Hello, ' || :NAME || '!' as GREETING from dual;
Scroll down a little from SQL source and expand the Variables section of the interface.
Define a new variable (case sensitive) as:
- Name:
NAME(this must match the bind name used in the SQL) - Type:
VARCHAR2 - Description:
A short string (name) of something or someone to greet.
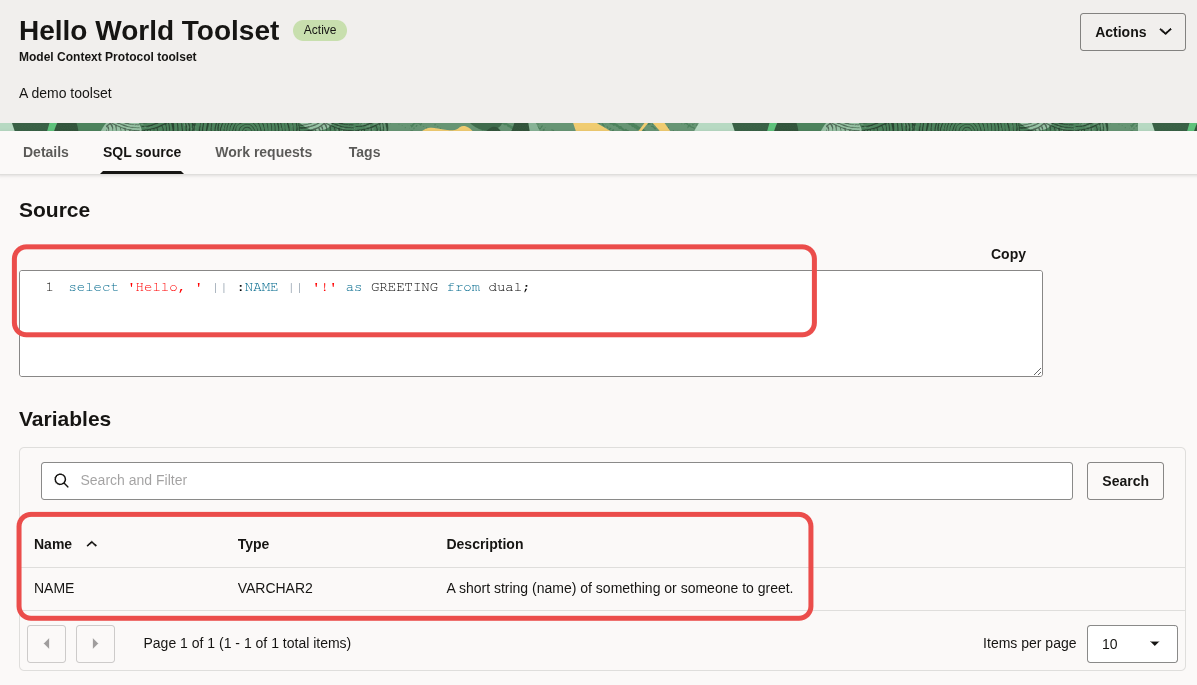 Example modifying a custom SQL tool to add bind variables.
With those changes in place, restart the MCP server in your LLM front-end. In my case I simply restarted Claude. Now, assuming your MCP server started successfully, ask your LLM to greet someone by name.
get a greeting for Bernard
Here is the intermediate confirmation from Claude that shows both the tool call and the variable that will be sent to the remote MCP server.
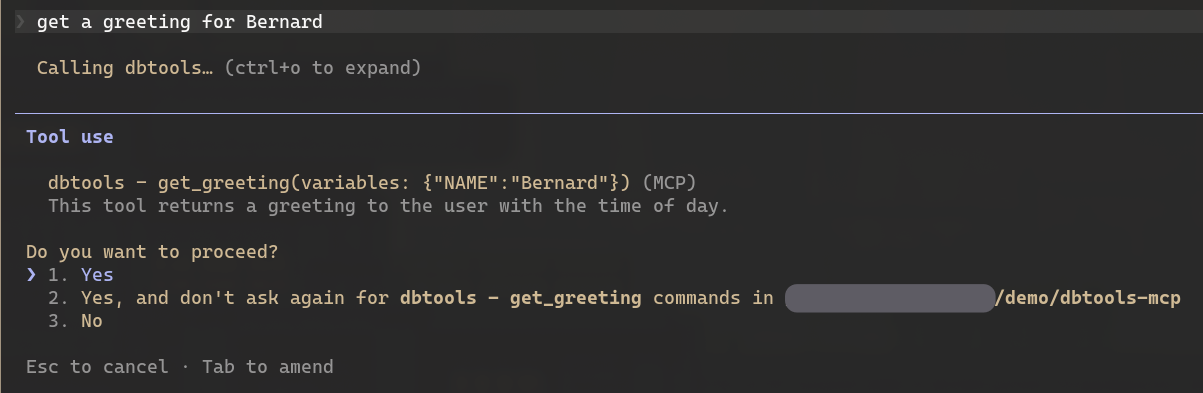 Example of an LLM client confirming the tool and variable to provide and execute.
With that the MCP server tool execution is completed and Claude generates a response. For example:
❯ get a greeting for Bernard

  Called dbtools (ctrl+o to expand)

● The greeting from the database: "Hello, Bernard!"
I also spotted a bug in my tool description that I should fix now.
Even though the model didn’t complain about it, I know it’s not right so I will fix it. I opened the toolset and edited it and modified the Tool description field of the toolset:
This tool returns a greeting to the user for a provided name.
This is one example of how the metadata you provide in your tools will find its way to the LLM. When the MCP client performs a tools/list call it will receive some metadata from the Database Tools service compliant with the MCP server protocol for tools.
MCP Toolset Context Debugging
The easiest way to get started debugging MCP servers locally is to use third-party tools like the MCP inspector to debug the metadata and responses returned by an MCP server.
Note: to use this inspector you will first need to have Node.js installed with
npxavailable. If you followed the tutorial above to setup your Database Tools MCP server with a registered OAuth client then you may also already havemcp-remoteinstalled. In any case, just use this as an example of one approach to debugging and configure the inspector with your MCP server as appropriate.
Here I use a custom shim for STDIO-to-remote OAuth protected remote MCP server so that I can get more debugging information. The inspector is calling the MCP server using STDIO mode which forwards the calls to the remote MCP server running in OCI. I might provide more information on this in the future once I have some time to polish it up a little. If this sounds interesting to you please let me know.
For now, you can try out mcp-remote with the MCP inspector with your configured MCP server to achieve the same effect.
npx @modelcontextprotocol/inspector mcp-remote-go https://mcp.dbtools.us-phoenix-1.oci.oraclecloud.com/20250830/databaseToolsMcpServers/ocid1.databasetoolsmcpserver.oc1.phx.yourmcpserverocid/actions/invoke --port 8080 --static-oauth-client-metadata "\"{\\\"scope\\\":\\\"urn:opc:dbtools:mcpserver:ocid1.databasetoolsmcpserver.oc1.phx.yourmcpserverocidmcp:all\\\"}\"" --static-oauth-client-info "\"{\\\"client_id\\\":\\\"youroauthclientidhere\\\"}\"" --host localhost --debug
If you are using personal access token-based authentication then you would provide that instead of the registered client metadata.
Note: You can find the expected
urnin the OCI console of your registered client under the Database Tools MCP server. For those familiar with OAuth, you can also find theurnusing the/.well-known/oauth-protected-resource/...endpoint. Just be aware that the scope should end inmcp:all(no space after the OCID of your MCP server).
After completing the OAuth flow, the MCP inspector sends tools/list and I can see that the Database Tools MCP server returned the following metadata about our get_greeting tool.
{
  "tools": [
    {
      "name": "get_greeting",
      "description": "This tool returns a greeting to the user for a provided name.",
      "inputSchema": {
        "type": "object",
        "properties": {
          "variables": {
            "type": "object",
            "description": "Object containing bound variable values to substitute into the SQL query. Values are coerced server-side to the declared Oracle types.",
            "properties": {
              "NAME": {
                "type": "string",
                "description": "A short string (name) of something or someone to greet. This value will be sent as a VARCHAR2 to the Oracle database."
              }
            },
            "required": [
              "NAME"
            ],
            "additionalProperties": false
          }
        },
        "required": [],
        "additionalProperties": false
      }
    },
    ...
  ]
}
Example tools/list response metadata from a Database Tools MCP server
You should notice a few interesting things about this payload, including some additional context hints provided by the Database Tools service about the type of the variable that needs to be passed when the tool is called.
From this we can infer some recommended practices for creating MCP toolsets but the short answer is to use good LLM context hygiene in general.
- Use short but descriptive tool names and add uniqueness where it is important to distinguish one toolset/tool from another (don’t name all your tools as
get_dataorrun_process, for example). - Use short but accurate descriptions that will help the LLM to identify and complete a given task from your natural language prompts.
- Select the appropriate database type for bind variables defined for a given custom SQL tool
- Variables defined are required so if you need to simulate an optional parameter then tell the LLM what value to pass in by default, although this may be unreliable in general. When in doubt, leave the variable out.
Wrapping Up
Now that you have seen how to create a custom SQL tool with the OCI Database Tools MCP server you can go out and create any custom tool you need to give your LLM access to specific functionality for your applications through a well-defined tool API.
Some ideas that come to mind for this custom SQL tool use case include:
- Generate an invoice PDF from an order
- Kick off a process by calling a custom PL/SQL package
- Executing some other functionality such as
DBMS_CLOUD...calls - Loading data into tables from a remote source
If you need your LLM to just run arbitrary SQL statements against your database or to run pre-defined SQL reports then the custom SQL tool is not the right solution for you. You should instead use the “Built-in SQL tools” toolset or create “SQL Report” resources and use a “Customizable reporting tools” report set instead.
I hope you found this post useful. Thank you for reading along.
Cheers!