
Build Tools That Speak to Data in OCI
Suppose you have a database in the cloud with relational schemas that support machine learning tasks, data analysis, or statistical analysis.
This will be my use case for the tool developed throughout this post. The Oracle Cloud Infrastructure (OCI) Python software development kit (SDK) will allow us to build tools for users to send structured query language (SQL) statements to a database and to convert the response to Pandas DataFrame objects in Python.
While interesting to me personally, the use case is not important if you just need to see an example. You can safely skip ahead to code samples and ignore the Pandas parts if you just want to see the SDK in action.
In the case of OCI, tenancy or resource administrators would create a Database Tools connection to give users access to a database. Here is an example just for visual reference:
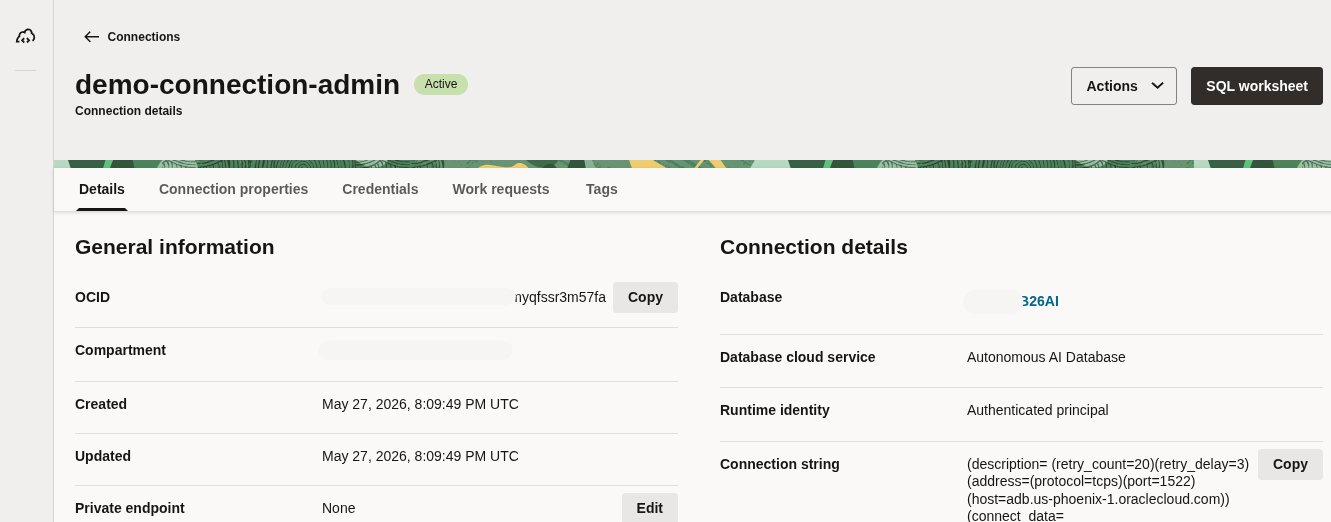 Example of a Database Tools connection in OCI configured for Autonomous AI Database 26ai.
If you do not have a Database Tools connection in OCI you should pause here and get one created. If you need some guidance here are links to posts and documentation:
Note: If you create Database Tools connections with
ADMINand share it with users, the Database Tools users will have admin-level access to the schema! Generally speaking, you should create a least privilege database user with access to create sessions, select from specific tables or views, etc. Connect responsibly!
Now let’s take a look at the specific dataset for this example.
Setting the Stage - A Dataset and A Use Case
With IAM permissions in place, Database Tools users can open the SQL worksheet and start sending statements to a database at the other end of the connection. For example, I ran a query to retrieve data from a table called IRIS_DATA. For this post, I used a familiar machine learning dataset for Iris classification [^1].
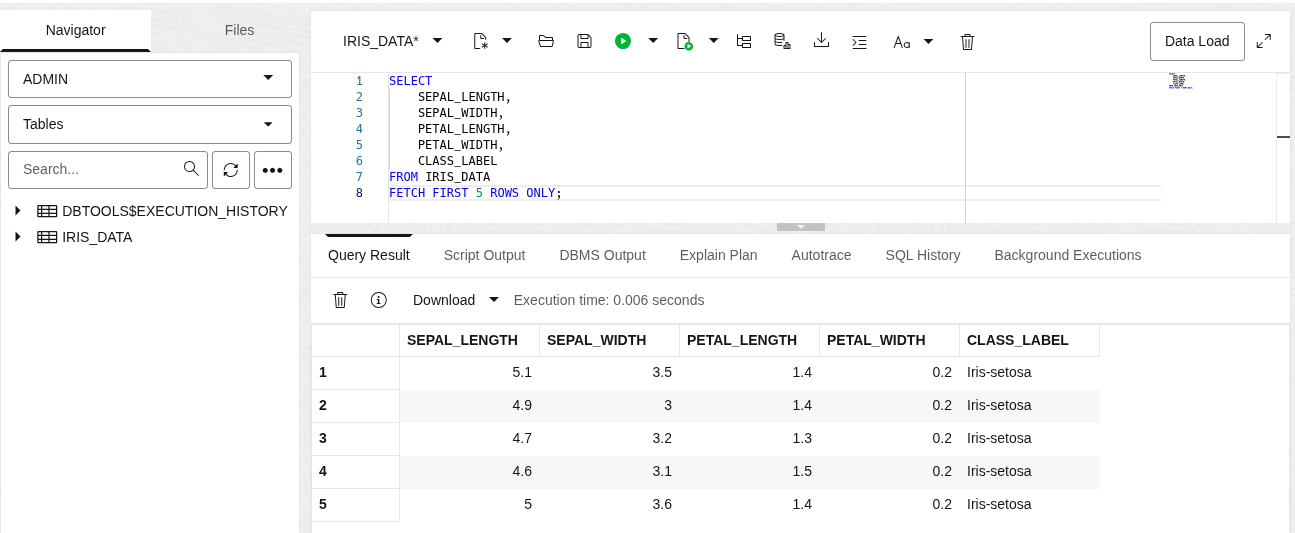 Example using the Database Tools SQL Worksheet to query relational tables.
The dataset includes four features (sepal length, sepal width, petal length, and petal width) and a target value for each sample that represents one of three types of iris, namely: Iris Setosa, Iris Versicolor, and Iris Virginica. We can verify the samples in the table by running a quick SELECT count(*)... GROUP BY ... query.
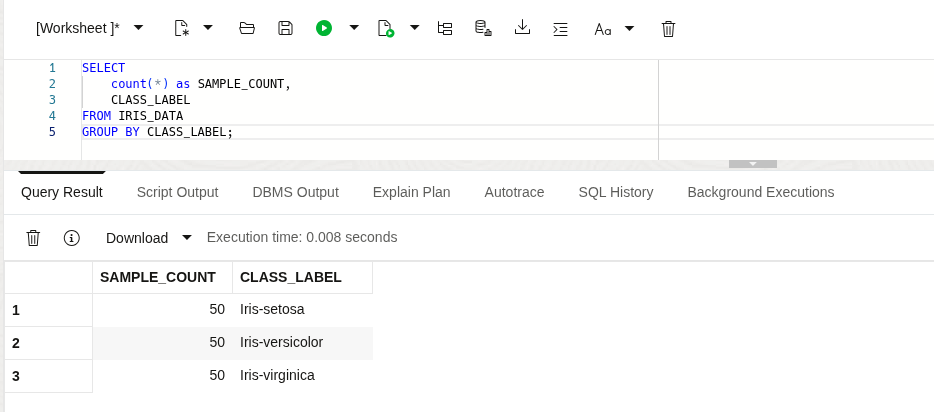 Example SELECT … GROUP BY … query showing counts of Iris samples in a table.
You can follow along with whatever dataset you have handy in a table (or view) in an Oracle Database in the cloud. Below is the Data Definition Language (DDL) used for the table in the example.
CREATE TABLE "ADMIN"."IRIS_DATA" (
    "SEPAL_LENGTH" NUMBER,
    "SEPAL_WIDTH" NUMBER,
    "PETAL_LENGTH" NUMBER,
    "PETAL_WIDTH" NUMBER,
    "CLASS_LABEL" VARCHAR2(64 BYTE)
);
Example DDL for a table in Oracle Database with some samples to analyze.
Typical machine learning tasks work with numerical datasets or categorical data that has been encoded to numerical data (one hot encoding, etc.) depending on the learning algorithm. This post does not assume a machine learning use case is required, it just grounds the example to a real use case.
By the end of this post, I want to be able to send the following SQL statement to a database and to have a tool that will respond with a Pandas DataFrame.
SELECT
    SEPAL_LENGTH,
    SEPAL_WIDTH,
    PETAL_LENGTH,
    PETAL_WIDTH,
    CLASS_LABEL
FROM IRIS_DATA
Example SQL query to select Iris samples from a table in Oracle Database.
Data science lives in Python and Database Tools helps users get real work done with databases in the cloud. The link between these two is the OCI Python SDK. For this example, I will use the Database Tools Runtime client and SDK.
Before we get to the good stuff, we need to take care of some technical details. We need to set up the Python dependencies and configure the OCI SDK. If you are already good to go on both of these tasks, you can skip ahead a few sections.
Python Setup
This post is not a Python tutorial, so I assume Python 3 is installed, you have some familiarity with Python, consuming libraries, and the language in general. To get started we need to import the following Python libraries:
- pandas
- oci
Personally, I like to use a virtual environment to keep dependencies isolated and project or task specific. Manage your dependencies however you like. Here is an example:
$ python3 -m venv .venv
$ source .venv/bin/activate
$ pip install pandas
$ pip install oci
If you are using Windows, then adjust for your environment accordingly. With these installed and the virtual environment activated, you should be able to import pandas and oci in a Python script or the interactive REPL.
import pandas as pd
import oci

print("Dependencies are working!")
When you run this interactively or in a .py program you should see this printed out in the console:
...
Dependencies are working!
If you see errors instead you should stop here and debug those before proceeding.
OCI SDK Setup
If you are completely new to working with OCI then you have some homework to do. All of the OCI generated SDKs and the OCI CLI operate on a common configuration format. In fact, the OCI CLI itself uses the Python SDK to interact with OCI services.
To keep this post simple, I am using the standard OCI configuration file that the OCI SDK understands. You can find details about setting up this OCI configuration file in the documentation:
- https://docs.oracle.com/en-us/iaas/Content/API/Concepts/sdkconfig.htm (in general)
- https://docs.oracle.com/en-us/iaas/tools/python/latest/configuration.html (for the Python SDK)
If you are deploying your Python tool to an environment where having such a configuration file stored on disk is not practical, you can define the client configuration using code. Refer to the above links as needed for more information.
Some things to consider:
- Does the OCI user have a public key uploaded to their OCI account? (Do you even want that?)
- Is the “user” an instance principal (such as an OCI compute host) that will be calling OCI?
- Is the “user” providing a temporary session token to authenticate instead of a user-uploaded public key?
Each of these considerations impacts how you need to configure an SDK client. However you choose to set up your environment for this example, I assume you have a valid configuration file with a private-public key pair and that it is configured in the DEFAULT profile.
You can configure your environment with any supported configuration you like, though you may need to adjust the Python SDK client configuration to account for the differences.
Keep in mind that except for tenancy administrators, due to the principle of least privilege, a user (or principal) requires IAM policies to be configured. More advanced configurations could use resource principals but I will not cover that in this post.
To validate the DEFAULT profile is working correctly, use the OCI CLI. You can read more about installing the CLI here.
$ oci iam region-subscription list
{
  "data": [
    {
      "is-home-region": true,
      "region-key": "PHX",
      "region-name": "us-phoenix-1",
      "status": "READY"
    }
  ]
}
This command will send a request to OCI Identity using my DEFAULT profile and will confirm that I am able to communicate with OCI using my private-public key pair.
Creating the Runtime Client
Now that we have a working OCI configuration file and the Python libraries installed, we can get to the good stuff… creating the Database Tools Runtime client that we need.
Note, I am not going to duplicate all the code in every step of this example. Assume that we have a single-file Python program and new lines of code are added to this file as we move along. At this point you should already have two
importstatements and a
Here I create a configuration and instantiate the runtime client.
import pandas as pd
import oci

# Create a new config object and instantiate the client
config = oci.config.from_file()
client = oci.database_tools_runtime.DatabaseToolsRuntimeClient(config)

print(f"OCI endpoint: {client.base_client.endpoint}")
If you save and run the program at this point you should see no errors and you should see an oraclecloud.com or whichever OCI domain is relevant to the region and realm of your tenancy.
$ python test.py
OCI endpoint: https://dbtools.us-phoenix-1.oci.oraclecloud.com/20230222
Now that we have a working client we can move on to sending SQL statements to the service.
Sending a SQL Statement to OCI
Since our objective is to execute a SQL statement synchronously, we will build the relevant request details. We are also expanding our import statements with a new import that is required to reference models from the Python SDK.
# ...
from oci.database_tools_runtime import models

# Create the "request details" object for a synchronous execution
details = models.ExecuteSqlDatabaseToolsConnectionSynchronousDetails(
    input=models.ExecuteSqlInputStandardDetails(
        statement_text="select 42 as MEANING from dual"
    )
)

# Send the SQL statement to the runtime service!
response = client.execute_sql_database_tools_connection(
    database_tools_connection_id="ocid1...yourconnectionidhere",
    execute_sql_database_tools_connection_details=details,
)

print(f"response: {response.data}")
Update the code with your connection ocid and then run it.
If you get a response with data from your query, you have just successfully executed SQL on your database through the Database Tools Runtime service. Congratulations!
Here is an example of the response.data value I received in response to my query shown above. If you need help debugging, keep reading.
$ python test.py
response: {
  "env": {
    "default_time_zone": "UTC"
  },
  "items": [
    {
      "binds": null,
      "dbms_output": null,
      "error": null,
      "properties": null,
      "responses": null,
      "result_set": {
        "count": 1,
        "has_more": false,
        "items": [
          {
            "meaning": 42
          }
        ],
        "limit": 10000,
        "metadata": [
          {
            "column_type_name": "NUMBER",
            "database_column_name": "MEANING",
            "is_nullable": true,
            "precision": 0,
            "scale": -127,
            "unique_column_name": "meaning"
          }
        ],
        "offset": 0
      },
      "result_set_object": null,
      "results": null,
      "statement_id": 1,
      "statement_pos": {
        "end_line": 1,
        "start_line": 1
      },
      "statement_text": "select 42 as MEANING from dual",
      "statement_type": "QUERY"
    }
  ],
  "type": "STANDARD",
  "version": null
}
If instead, you got an error response, then you have just identified a new learning opportunity. Congratulations! Alright, in all seriousness, you need to debug the error. I will present a common example in the next section.
Debugging Response Errors
Here is an example of a common 404 error response from OCI.
oci.exceptions.ServiceError: {'target_service': 'database_tools_runtime', 'status': 404, 'code': 'NotAuthorizedOrNotFound', 'opc-request-id': 'D7430C8ECD144A01BF6C7876315C8625/EC3281227D0BE1E7F7B02E6A50485827/83CDB2A97A5770351E7AFFA30A679206', 'message': 'Authorization failed or requested resource not found.'...
If you get such a 404:
- Double-check that you updated the
database_tools_connection_idfrom the example above with the correctocid. (The example code will not work without modification!) - Make sure the OCI config profile you are using (i.e.
DEFAULT) has access to OCI. - Make sure the connection validates as
OKusing this profile. - Make sure the database user of the connection has access to select data from the database objects referenced in your SQL!
OCI “access” in this case means proper IAM policies exist, which is necessary if you are not the tenancy administrator. That said, if you can validate the connection in the OCI console, you already have all the permissions required to
usethe connection.
It is also good practice to check the config and principal access to connections using the OCI CLI. Here is an example command I might use to check a given connection.
$ oci dbtools connection validate-oracle-database --connection-id <your-ocid>
{
  "data": {
    ...
    "code": "OK",
...
If you are sure that you have the right connection ocid and the above CLI command works as expected, you are likely missing something in the Python code above. Double-check the code.
If you need to specify a non-DEFAULT profile you can do so via --profile on the CLI or using the profile_name parameter when instantiating the runtime client.
Converting the Response to a DataFrame
Now that we have a working pipeline from SQL > to Database Tools Runtime service > to result set > to JSON response in Python, we can convert it to a Pandas DataFrame. I will also update the query at this point to use the IRIS_DATA table mentioned at the beginning of the post.
Note, Pandas can instantiate a
DataFramedirectly from a list of uniformdictobjects which is exactly what you should get back from a valid query against a relational database object when using the Database Tools Runtime service.
In the code below I am referencing the first item in the response [0] and then getting the result_set.items value from it. It is just interesting to note that the Runtime service allows users to execute more than one statement per request.
# import ...
iris_sample_query = """
SELECT
SEPAL_LENGTH,
SEPAL_WIDTH,
PETAL_LENGTH,
PETAL_WIDTH,
CLASS_LABEL
FROM IRIS_DATA
"""
# ... updated request details...
details = models.ExecuteSqlDatabaseToolsConnectionSynchronousDetails(
input=models.ExecuteSqlInputStandardDetails(
statement_text=iris_sample_query,
limit=-1,
)
)
# response = ...
data = response.data.items[0].result_set.items
# create the DataFrame from the result returned by Database Tools Runtime
df = pd.DataFrame(data=data)
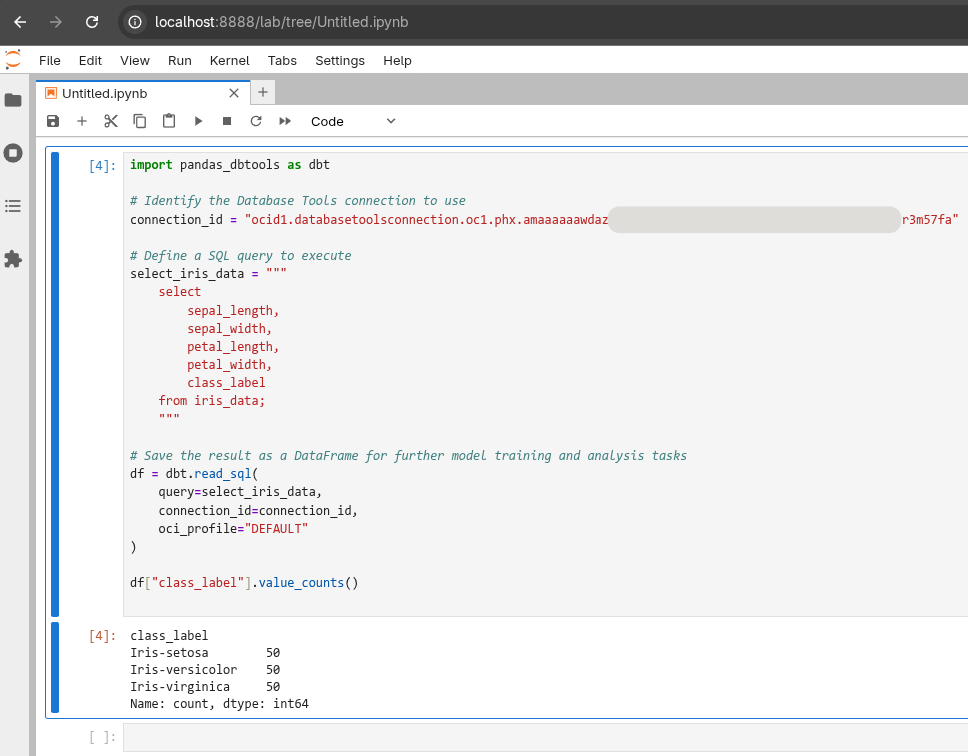
print(df["class_label"].value_counts())
Update the code and then run it using the above query given the Iris dataset, and you should see something similar to the following:
$ python test.py
class_label
Iris-setosa        50
Iris-versicolor    50
Iris-virginica     50
Name: count, dtype: int64
Cool! We now have everything in place that we need to use the Database Tools Runtime service with Python projects. In a production implementation you would, of course, need to add error and edge-case handling. Common cases would be HTTP error responses, database errors returned for invalid SQL statements, no rows returned, etc.
Using the Custom Tool in Jupyter
I took everything we learned above and created a proof of concept called pandas-dbtools to interact with data from a table inside a notebook by calling the Database Tools Runtime service. To me this is all very exciting stuff!
You can find the sample code at:
Start a new empty folder and create a fresh virtual environment. From there you can install Jupyter Labs and pandas-dbtools in your virtual environment using:
pip install git+https://github.com/icodealot/pandas-dbtools.git
pip install jupyterlab
Once you have the dependencies installed you can start Jupyter Lab and test out pandas-dbtools by converting SQL query results into DataFrame objects.
$ jupyter lab
Jupyter Lab should start up and from there we can use everything we have learned so far, but from within a notebook. This is great because it adds a new tool in our tool belt while simultaneously allowing data scientists and machine learning enthusiasts to train models from data queried out of tables in the cloud.
Congratulations for making it to this point!
Making this work in a fully remote environment where you do not have a local OCI configuration is beyond the scope of this post although it is very doable. That said, you should now have everything you need to make that work. The main thing would be storing secrets securely and making sure the Runtime client is configured correctly to make the calls to the OCI service. Everything else should basically work as described above.
You achieved a lot and I hope, learned a lot in the process. We came out on the other side of this together with a working example of calling OCI Database Tools Runtime service using the Python SDK. We can execute SQL statements and convert the results into something useful for data scientists and users of Pandas.
Cheers!
[^1]: The Iris dataset: https://archive.ics.uci.edu/dataset/53/iris Fisher, R. (1936). Iris [Dataset]. UCI Machine Learning Repository. https://doi.org/10.24432/C56C76.