
Automate SQL Report Deployments Like a Pro
Database Tools SQL Reports are a first-class resource in Oracle Cloud Infrastructure (OCI) which means you can manage them automatically using all of the standard OCI interfaces. Supported options include the OCI CLI, the various OCI software development kits (SDKs) as well as the Terraform provider for OCI.
You can, of course, create SQL reports by hand using the OCI console in your web browser but this does not scale well when it comes to managing and deploying source code in your cloud infrastructure. This post will help you learn how to address this challenge.
You can learn more about Database Tools SQL Reports from the official documentation or by reading Build Relational Guardrails for Agents with SQL Reports.
Prerequisites
Before we get started with the demo of automating the deployment of resources in OCI using Terraform you will need to take care of a few prerequisites:
- Terraform needs to be installed
- You need an OCI tenancy (always-free is fine for this demo)
- You need an OCI config file profile configured for your tenancy so you can run
terraform planorapplyusing the Terraform provider for OCI
If you are not following along with a tenancy administrator account or an account that is granted broad privileges to a compartment, then keep in mind you will also need IAM policy statements granting access to manage SQL reports in some compartment. From a principle of least-privilege perspective, you can use manage database-tools-sql-reports in such a policy.
Note: You should theoretically be able to follow-along with OpenTofu as well, although I have not tested this Terraform-compatible Infrastructure as Code (IaC) tool for this use case.
Assuming you got that out of the way, let’s get straight into the configuration of SQL Reports using the Terraform configuration language.
Configuring the Provider
The first thing you need to do is to make sure you have configured your OCI provider in a Terraform configuration. This is done by setting up a terraform block where you mention the required providers. This will be paired with a provider block where you need to configure your OCI profile and authentication scheme as needed.
- Create a new folder somewhere you plan to work. I called mine
demo-resources. - Inside this folder create new files:
input.tf- we will put configuration variables heremain.tf- we will put our provider block and SQL Report configuration here
Feel free to skip all this boilerplate and jump ahead if you just want to see the resource bits in action. This scaffolding is appropriate for a simple configuration and for the sake of a demo.
Inside input.tf place the following:
variable "compartment_id" {
  type        = string
  description = "The compartment in which to create the demo SQL report."
}
Inside main.tf place the following:
terraform {
  required_version = ">= 1.5"

  required_providers {
    oci = {
      source  = "oracle/oci"
      version = ">= 8.20"
    }
  }
}

provider "oci" {
  config_file_profile = "DEFAULT"
}
Note: the example configuration above assumes you are authenticating with OCI using a private-public API key uploaded to the user’s profile in OCI. If you are using session token authentication instead make sure you configure the provider as needed.
Once we have the provider configured we need to initialize Terraform. This will download the OCI provider and install it in a new .terraform directory.
terraform init
If all goes well, you should see something like the following. If not, stop here and debug the errors before moving on.
❯ terraform init
Initializing provider plugins found in the configuration...
- Finding oracle/oci versions matching ">= 8.20.0"...
- Installing oracle/oci v8.20.0...
...

Terraform has been successfully initialized!
...
With that out of the way, we can move on with the SQL Report creation.
Declaring a SQL Report Resource
You can declare a Database Tools SQL Report resource in Terraform by specifying a resource block. Let’s start with a simple SQL report that has the following SQL source code:
select 42 as MEANING from dual;
Here is a basic resource block for the above. Notice that we are specifying the compartment using the Terraform variable var.compartment_id defined above. We will come back to this shortly. Feel free to use the same approach or hard-code some compartment ID if you prefer.
Open main.tf and add the following resource configuration:
resource "oci_database_tools_database_tools_sql_report" "demo_report" {
  # General OCI resource metadata
  compartment_id = var.compartment_id
  display_name   = "demo-sql-report"
  description    = "A demo SQL report created via Terraform"
  type           = "ORACLE_DATABASE"

  # Metadata that is meant to be useful for LLMs
  purpose      = "Allows the user to find the meaning of life"
  instructions = <<-EOT
    Execute this report to learn what is the meaning of life
  EOT

  source = "SELECT 42 as MEANING FROM dual"

  # Good practice, that, like documentation, requires maintenance!
  columns {
    name        = "MEANING"
    type        = "NUMBER"
    description = "A number that represents the meaning of life."
  }
}
The compartment, display name, description, and source are self-explanatory. For type the only value supported at the time of this writing is ORACLE_DATABASE. You can learn more about the OCI types involved by inspecting the following documentation:
Database Tools SQL report resources include some metadata meant to be useful for an LLM that may use a SQL report in the context of a Database Tools MCP server invocation. In that spirit, you should supply useful information for:
- purpose
- instructions
- columns (repeatable, once for each column in the projection)
Just bear in mind that these elements are like documentation and are not validated for accuracy. Like any form of documentation, these require maintenance by the report author to ensure relevance to the actual code you put in source.
Deploying the SQL Report to OCI
With the above in place, let’s run terraform plan and terraform apply to create our SQL report in the compartment.
terraform plan -var="compartment_id=ocid1.compartment.oc1..aaaaaaaexampleocid"
If you execute the above you should see something similar to the following but with your own resource metadata defined and your own compartment ID specified.
❯ terraform plan -var="compartment_id=ocid1.compartment.oc1..aaaaaaaexampleocid"

Terraform used the selected providers to generate the following execution plan. Resource actions are indicated
with the following symbols:
  + create

Terraform will perform the following actions:

  # oci_database_tools_database_tools_sql_report.demo_report will be created
  + resource "oci_database_tools_database_tools_sql_report" "demo_report" {
      + compartment_id    = "ocid1.compartment.oc1..aaaaaaaexampleocid"
      + defined_tags      = (known after apply)
      + description       = "A demo SQL report created via Terraform"
      + display_name      = "demo-sql-report"
      + freeform_tags     = (known after apply)
      + id                = (known after apply)
      + instructions      = <<-EOT
            Execute this report to learn what is the meaning of life
        EOT
      + lifecycle_details = (known after apply)
      + purpose           = "Allows the user to find the meaning of life"
      + source            = "SELECT 42 as MEANING FROM dual"
      + state             = (known after apply)
      + system_tags       = (known after apply)
      + time_created      = (known after apply)
      + time_updated      = (known after apply)
      + type              = "ORACLE_DATABASE"

      + columns {
          + description = "A number that represents the meaning of life."
          + name        = "MEANING"
          + type        = "NUMBER"
        }

      + locks (known after apply)

      + variables (known after apply)
    }

Plan: 1 to add, 0 to change, 0 to destroy.
...
The plan looks good to me so I will go ahead and rerun the command again with apply this time. If all goes well you should see something like the following:
...
Do you want to perform these actions?
  Terraform will perform the actions described above.
  Only 'yes' will be accepted to approve.

  Enter a value: yes

oci_database_tools_database_tools_sql_report.demo_report: Creating...
oci_database_tools_database_tools_sql_report.demo_report: Creation complete after 1s [id=ocid1.databasetoolssqlreport.oc1.phx.amaaaaaawdazdryafql2x5vourau6jj5j4a42dg6g7kkzxmlygjswxiotocq]

Apply complete! Resources: 1 added, 0 changed, 0 destroyed.
You can find SQL Reports in the OCI console. Login to your tenancy and navigate to:
The hamburger>Developer Services>Database Tools>SQL Reports
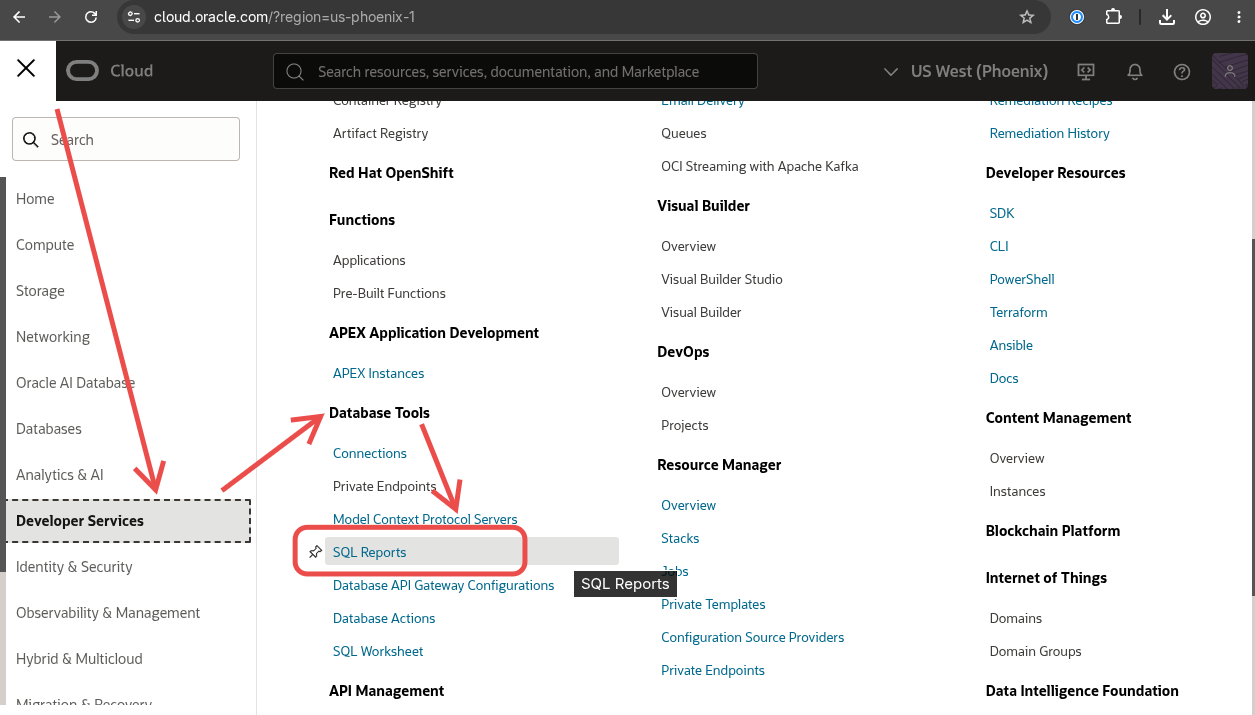 Example of navigating to SQL Reports in the OCI console via web browser.
When I open the compartment where I deployed my SQL report using Terraform, I can see the following, for example:
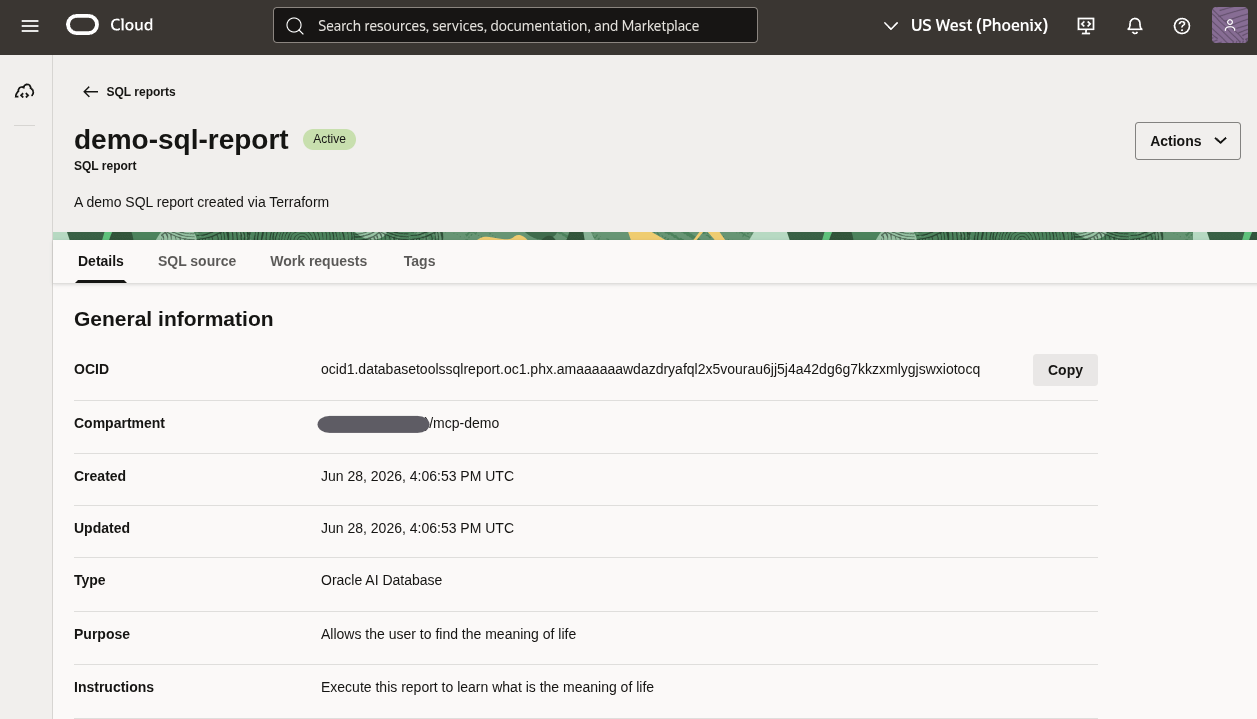 Example SQL report deployed in OCI using Terraform.
About Version Control
Now is a good time to mention that if you were keeping track of changes to your configuration using something like Git, then you could also configure some kind of automated deployment process. This is a recommended practice in general and part of the whole reason we are doing this configuration in code to begin with.
We get to define our infrastructure as code and we can keep it in source control! This is a typical workflow at a very simplified level of detail. For example, you might:
- Get a change in requirements for your cloud resource
- Check out the source for your latest infrastructure as code
- Update the source and commit the change to your source control
- Deploy the latest changes to your infrastructure in the cloud
In the context of this post, that change is a new SQL report that we just deployed to the cloud.
Updating the SQL Report
Now that we have a SQL report defined in our Terraform configuration let’s go back and modify it with a slightly more complex query and using more features of the SQL report resource. We will add a bind variable and additional columns. We will also change out the query to be something more interesting than just selecting 42. We will update:
descriptionto match the new use casepurposeto give an LLM more an updated description of the reportinstructionsso the LLM knows how to use this SQL reportcolumnsadded for each column in the new report definitionsourceto reflect the updated SQL we want to have, including a new :BIND variablevariablesblock added to describe the bind variable we added tosource
Open main.tf and update your existing SQL report with this new definition:
resource "oci_database_tools_database_tools_sql_report" "demo_report" {
  # General OCI resource metadata
  compartment_id = var.compartment_id
  display_name   = "demo-sql-report"
  description    = "Returns objects from ALL_OBJECTS matching the supplied STATUS bind variable. No DBA privileges required."
  type           = "ORACLE_DATABASE"

  # Metadata that is meant to be useful for LLMs
  purpose = "List database objects visible to the current user, filtered by object status."

  instructions = <<-EOT
    Use this report to inspect objects in the current schema or any schema accessible
    to the connected user. Supply the STATUS variable with one of: VALID, INVALID.
    Run this report when a user asks about compiled objects, invalid packages,
    or the overall state of schema objects.
  EOT

  source = <<-EOT
    SELECT
      o.owner,
      o.object_name,
      o.object_type,
      o.status,
      o.last_ddl_time,
      o.created
    FROM
      all_objects o
    WHERE
      o.status = :STATUS
    ORDER BY
      o.owner,
      o.object_type,
      o.object_name
  EOT

  # Describe each column returned by the query so agents can interpret results.
  columns {
    name        = "OWNER"
    type        = "VARCHAR2"
    description = "Schema that owns the object."
  }

  columns {
    name        = "OBJECT_NAME"
    type        = "VARCHAR2"
    description = "Name of the database object."
  }

  columns {
    name        = "OBJECT_TYPE"
    type        = "VARCHAR2"
    description = "Type of the object: TABLE, VIEW, PACKAGE, PROCEDURE, FUNCTION, INDEX, TRIGGER, etc."
  }

  columns {
    name        = "STATUS"
    type        = "VARCHAR2"
    description = "Compilation status of the object: VALID or INVALID."
  }

  columns {
    name        = "LAST_DDL_TIME"
    type        = "DATE"
    description = "Timestamp of the last DDL change to the object."
  }

  columns {
    name        = "CREATED"
    type        = "DATE"
    description = "Timestamp when the object was created."
  }

  # Expose the bind variable so agents know what parameter to supply.
  variables {
    name        = "STATUS"
    type        = "VARCHAR2"
    description = "Object status filter. Accepted values: VALID, INVALID."
  }
}
With this in place, you can terraform plan and terraform apply to see the impact on your already deployed SQL report. If all goes well, you should see something like the following:
...
Plan: 0 to add, 1 to change, 0 to destroy.

Do you want to perform these actions?
  Terraform will perform the actions described above.
  Only 'yes' will be accepted to approve.

  Enter a value: yes

oci_database_tools_database_tools_sql_report.demo_report: Modifying... [id=ocid1.databasetoolssqlreport.oc1.phx.amaaaaaawdazdryafql2x5vourau6jj5j4a42dg6g7kkzxmlygjswxiotocq]
oci_database_tools_database_tools_sql_report.demo_report: Modifications complete after 1s [id=ocid1.databasetoolssqlreport.oc1.phx.amaaaaaawdazdryafql2x5vourau6jj5j4a42dg6g7kkzxmlygjswxiotocq]

Apply complete! Resources: 0 added, 1 changed, 0 destroyed.
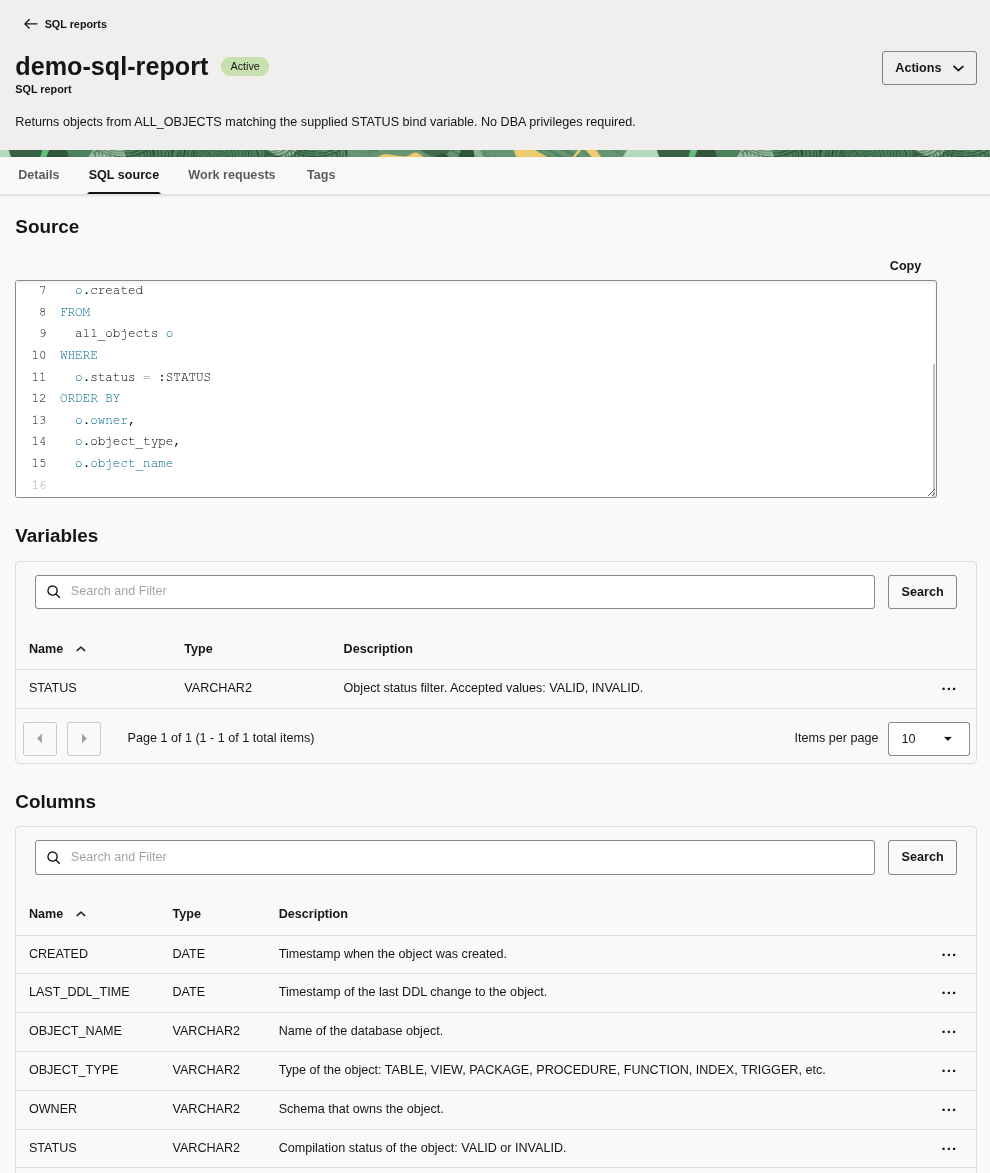
With those changes in place, I can see that Terraform has dutifully deployed my modified SQL report.
Wrapping Up
If you were following along with this post and you created this resource in a standalone configuration somewhere you can clean up by running a terraform destroy. For example:
terraform destroy -var="compartment_id=ocid1.compartment.oc1..aaaaaaaexampleocid"
CAUTION: If you added the SQL report resource in some larger, preexisting configuration, you will most likely not want to destroy all of your resources. Instead you can just delete the SQL report
resourceblock from your configuration and re-plan/apply and Terraform should clean it up for you automatically.
...
Plan: 0 to add, 0 to change, 1 to destroy.

Do you really want to destroy all resources?
  Terraform will destroy all your managed infrastructure, as shown above.
  There is no undo. Only 'yes' will be accepted to confirm.

  Enter a value: yes

oci_database_tools_database_tools_sql_report.demo_report: Destroying... [id=ocid1.databasetoolssqlreport.oc1.phx.amaaaaaawdazdryafql2x5vourau6jj5j4a42dg6g7kkzxmlygjswxiotocq]
oci_database_tools_database_tools_sql_report.demo_report: Destruction complete after 0s

Destroy complete! Resources: 1 destroyed.
This is really all there is to managing your SQL reports through Terraform.
Keep in mind that there are some text length limits involved so you cannot store infinitely large chunks of SQL in a SQL report. Otherwise you now have all the knowledge required to go forward and automate your SQL report deployments in the cloud like a pro.
I hope you found this useful and that it helps you along the way. You can find a source-code example of this Terraform configuration here:
Cheers!