
Exporting Basic SVGs From Photoshop
I just want to knock out some quick SVGs in Photoshop and get back to playing.
Note: there are different ways to accomplish the same thing. There are certainly other tools that can convert raster images to SVG files. Here I focusing on simple images and using Photoshop… think icons for CSS.
For illustration work or more complicated SVG images you should use the best tools for your task. (i.e.: Illustrator, etc.)
For the sake of those who may be new, lets review some over-simplified concepts, but… TL/DR: If you landed here just searching for a Photoshop / SVG solution you can skip to the next section(s).
- SVG: means Scalable Vector Graphics and SVG is an image format that stores paths, shapes and color in terms of vector-based instructions (i.e.: paths or instructions for some other program to redraw the image) without loss of detail at any scale.
- Using formats such as: PNG, JPG or GIF - images are stored in various sizes (resolution) and depth of color or opacity, on a per-pixel basis. That is, non-SVG image formats are typically created with a pre-determined size in mind. One benefit of those formats is that you can represent detailed or complicated images (such as a photograph, painting or flip-book style animation) but at the expense of requiring a pre-determined / fixed size.
- Resizing non-SVG images when viewing or editing them can affect image quality because the original raster image data (organized into sequential rows of contiguous pixels) needs to be shifted and approximated to fit into the available pixels. This approximation is necessary to account for pixels that are to be added or replaced when scaling the image up or down. An example of this guess-work by Photoshop can be seen below.
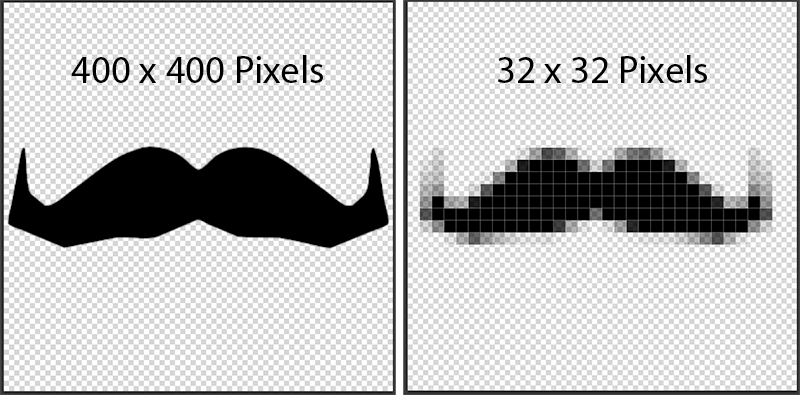
Resizing a raster image from 400 to 32 pixels. Note the edge blurring effect.
Alright that’s enough review for now. Lets get back to Photoshop.
Scenario 1: Exporting Simple Shapes as SVG from Photoshop:
As of the time of this writing (December, 2020), Photoshop has had support for simple paths and shapes for quite some time. You can learn more about creating vector shapes in Photoshop from Adobe: here.
Create a new photoshop document with the canvas size you would like to have your SVG initially set to and then add a shape to it. Assuming you have a non-raster path / shape in your photoshop document, you can choose:
File -> Export -> Export As
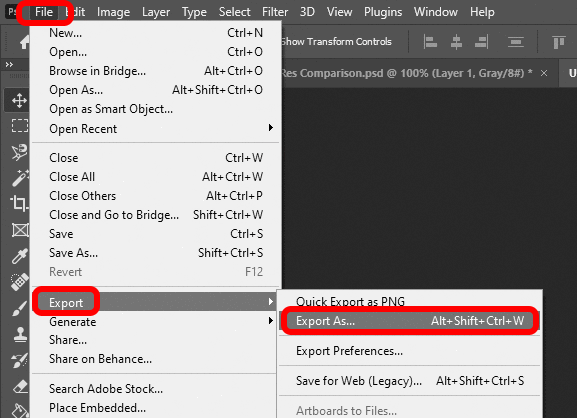
Once the export dialog opens, you will need to change the Format to “SVG” and then press Export.
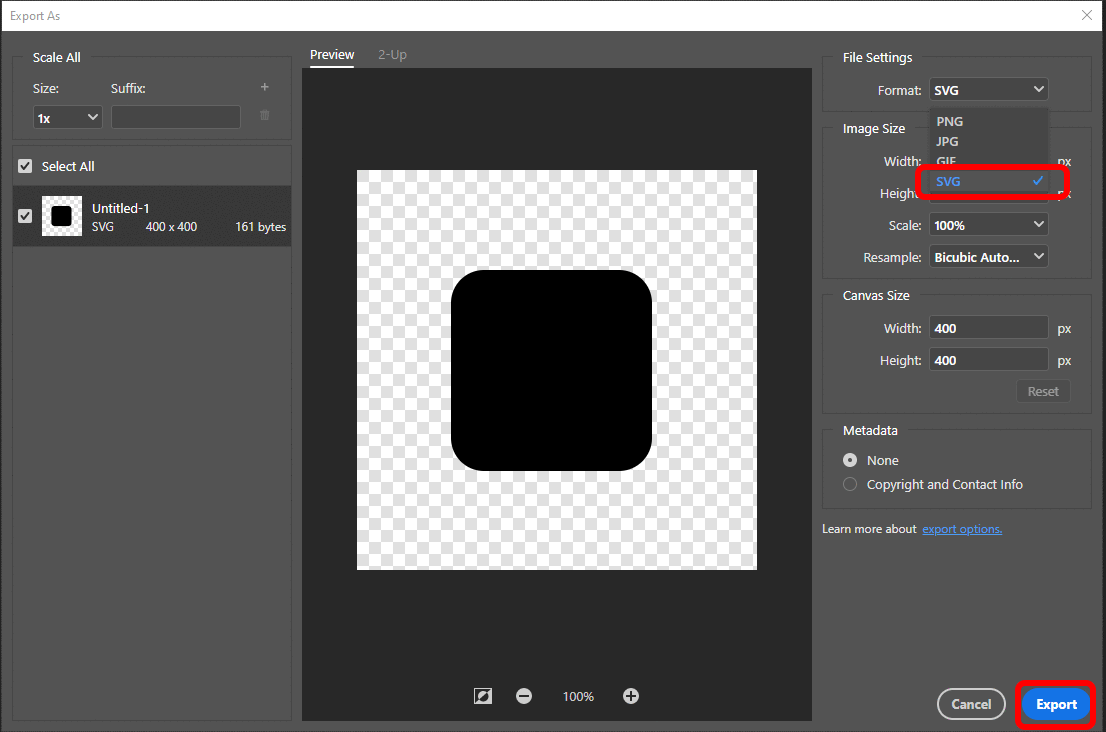
You should be prompted to save your .SVG file somewhere on your hard-drive. Inspect the contents of that SVG file in a text editor and you should see path / shape, etc. instructions that other programs will use to render the SVG image.
Yours will probably look different than mine depending on what shapes, canvas size, etc. you created before exporting your SVG.
<svg xmlns="http://www.w3.org/2000/svg" width="400" height="400" viewBox="0 0 400 400">
  <rect x="94" y="100" width="201" height="201" rx="33" ry="33"/>
</svg>
Example SVG exported from Photoshop.
Caution: If your SVG file contains a base64 encoded string preceded by data:img/png;base64, or similar then you probably tried to export a rasterized image layer instead of a shape / path layer. What you have done in that case is take your rasterized sequence of pixel values and store them in an SVG wrapper. This is not what you want.
<svg xmlns="http://www.w3.org/2000/svg" xmlns:xlink="http://www.w3.org/1999/xlink" width="400" height="400" viewBox="0 0 400 400">
  <image id="Rectangle_Raster" data-name="Rectangle Raster" x="94" y="100" width="201" height="201" xlink:href="data:img/png;base64,iVBORw0KGgoAAAANSUhEUgAAAMkAAADJCAYAAACJxhYFAAAGLUlEQVR4nO3d3avlVR3H8c85jhMNgwbRYDgzyoylE5R6IT6QIAap3YQWBfUnaF33DwQRBl0o3gxWlFBeKCaUdeFNUOmNzo1PqDTOSKD... blah blah blah etc..."/>
</svg>
You can usually tell if you are working on a shape layer if it has the path symbol on the lower right corner of the layer icon. This is found in the Layers panel. Here is an example comparing the two layer types.
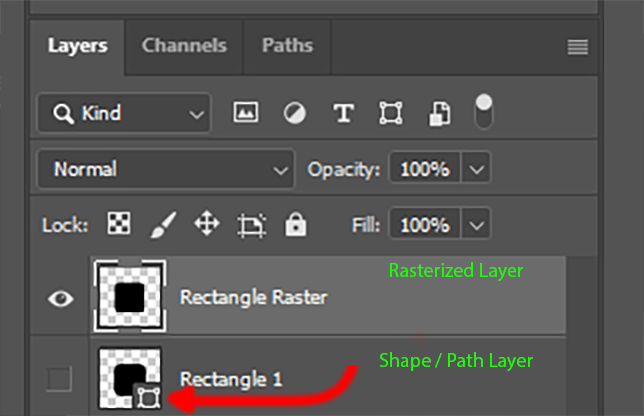
Alternatively, if you right-click on a layer and “Rasterize layer” is greyed out then you probably need to go back and create your shape layer first. There are other hints all over Photoshop but these are two I would start with.
What if you don’t have a shape layer but you still want to export it as an SVG? Don’t give up! Read on friends.
Scenario 2: Convert your existing rasterized shape to a path from selection:
Suppose you have a rasterized image that contains the shape of an icon that you want to export. Perhaps you are adding some custom icons to your website and want to go the SVG rout instead of exporting rasterized image files.
First you will want to create a selection of the solid color areas of this raster image using the selection tools. I prefer to use the magic wand tool and hold shift to select multiple areas of the icon as needed. You may need to adjust your selection tool settings to tighten things up.
You can add a solid background color that contrasts with your icon color and then enable “sample all layers”. This combined with a lower tolerance value should really really tighten up the selection. In my case, this is just a demo focusing on the SVG exports so I am going to keep it simple.
![]()
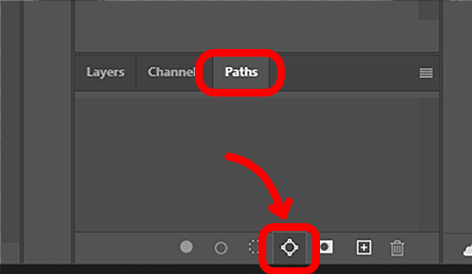
With the selection still active choose:
Paths -> Make Work Path from Selection (icon on the lower bar of the Paths panel)
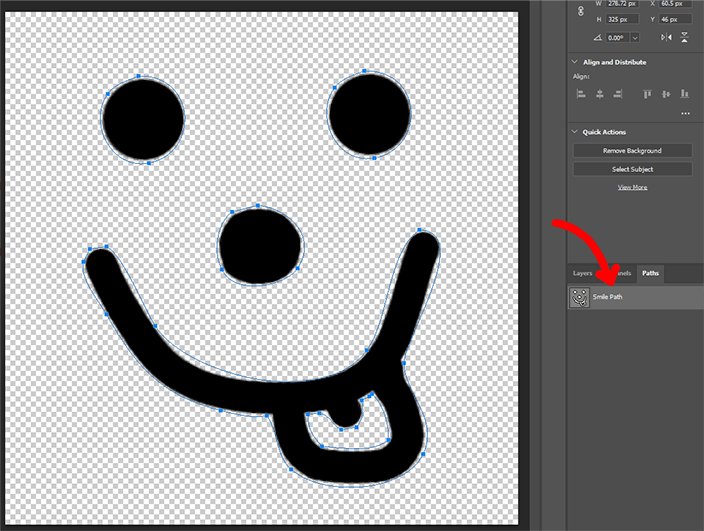
This will create a rough shape path of your selection and you may need to tweak this path once it is created to clean up anything you are not happy with. Add new anchor points, move them around, tweak the curve handles, etc. Assuming you are keeping it simple then this should not be too much of an issue.
For me, the path is created with a default name. I just double-clicked on it and renamed mine to “Smile Path”.
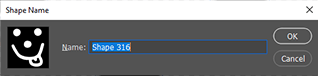
Select the path layer you just created under the Paths tab and choose:
Edit -> Define Custom Shape…
This will prompt you for a name of the custom shape. Enter something meaningful and then press OK.
Now that you have a custom shape of your originally rasterized icon, you can use the Photoshop Shape tool to create a shape layer from it, which will be a scalable vector path object, instead of a rasterized image.
Now that we have a custom shape created from our selection we can simply create copies of it using the Custom Shape Tool. Add a new layer or start a blank document and then select your custom shape for the Custom Shape Tool and drag one out. If you need to fix the proportions so your icon doesn’t stretch out, you can hold Shift wile drawing.
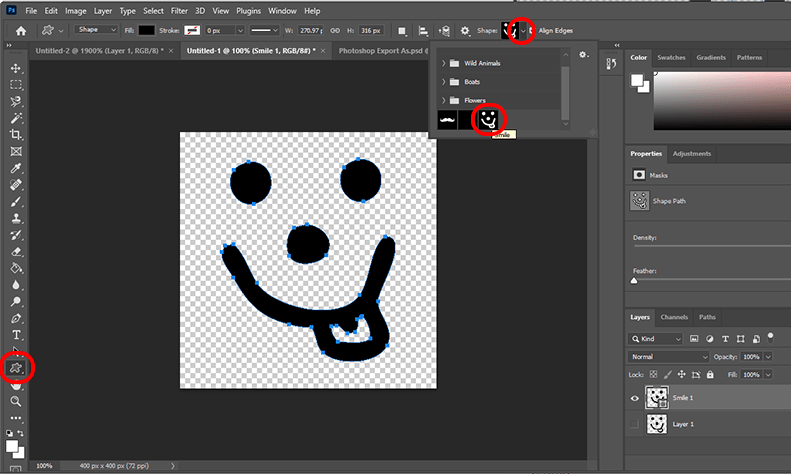
Be sure to hide or delete your rasterized source layer and then follow the steps from Scenario 1 above to create your SVG file. If all goes well hopefully you will end up with something similar to the following XML.
<svg xmlns="http://www.w3.org/2000/svg" width="400" height="400" viewBox="0 0 400 400">
  <defs>
    <style>
      .cls-1 {
        fill-rule: evenodd;
      }
    </style>
  </defs>
  <path id="Smile_1" data-name="Smile 1" class="cls-1" d="M278.971,46c46.61-1.007,47.929,60.552,7.981,67.872-29.726,5.446-47.3-32.841-30.926-54.9C261.414,51.72,269.972,49.874,278.971,46ZM103.4,49.993c45.9-.989,47.25,60.637,7.981,67.872-29.57,5.448-47.894-32.054-31.923-53.9C85.291,55.982,93.484,54.226,103.4,49.993ZM196.171,150.8c23.442,2.032,47.406,24.105,30.925,48.907-9.8,14.743-49.776,21.582-58.857,1-7.306-13.3-3.462-37.478,7.981-44.915Zm125.7,18.964c42.454,1.277-12.055,85.791-11.971,103.8,0.106,22.879,27.954,43.755,14.964,70.866-14.323,29.893-76.665,34.075-102.751,11.977-11.786-9.983-9.685-29.215-18.955-41.921-10.615,2.5-25.206-1.333-35.913-3.992-48.177-11.967-67.352-36.779-88.785-74.859C73.324,226.524,56.9,207.166,60.5,194.719l4.988-9.981,12.969-2c13.139,7.141,28.914,47.646,37.908,61.883,23.9,37.837,130.645,66,164.6,18.965C298.426,239.4,297.259,186.746,321.867,169.766Zm-86.79,143.728c0.236,13.264,5.044,17.9,10.974,24.953,19.863,1.585,39.993,4.693,51.874-4.991,0.368-15.293-5.1-28.575-12.969-35.932l-2,2-5.985,2.994c2.074,10.143,1.033,13.892-3.991,20.96l-11.971,2c-6.99-3.87-8.622-11.276-16.959-12.976Z"/>
</svg>
That’s all there is to it. This is how I knocked out my Movember-themed SVG navigation icon. I hope you found this useful and that it helps you get more out of Photoshop. Happy SVG’ing. Until next time.
Cheers-