

Whatever label you put on it - Cloud Computing, Something as a Service, Web Application, Etc... - there is no shortage of hosted software running on other people's servers. 'Tis the season for "RESTful web services" integration and JSON is definitely in the air. Oh, and Pis, lots of Raspberry Pis.
In February of 1997 Sun Microsystems released Java 1.1 which included Remote Method Invocation (RMI).
One night after class Rick Wurster, a buddy from school, and I were working on getting an RMI experiment off the ground. Objects on my laptop were going to call methods of objects on Rick's laptop remotely and get a response. Something magical happens the first time you see a console application echo responses from a remote object. In that moment we were standing on the shoulders of giants. We celebrated as geeks do with a high-five.
Thanks to all who worked on the technology stacks making that moment possible. 👍
By the late 90's the world was rapidly shifting to Hyper Text Transfer Protocol (HTTP) with innovations paving the way for what we think of in 2016 as RESTful web services. The approach to calling objects (business logic) on remote servers evolved over the years but the goal remained the same.
A bit of marketing glitz and glamour make them sound like the new hotness but REST-based services for integration have been proposed at least as early as 2000.
The Use Case
I started playing with the Raspberry Pi 3 B and at work we use a timekeeping system called Harvest. You don't need Harvest. I only mention it here because Raspberry Pi-envy and getting data out of Harvest and then into our resource forecasting application were the inspiration for what you are reading. Here is what I want to accomplish:
- Use RESTful web service calls to extract data in JSON format
- Parse the JSON results into relational tables
- Integrate the relational data into our resource forecast
- Run the whole process from a Raspberry Pi
The architecture for this looks something like the following:
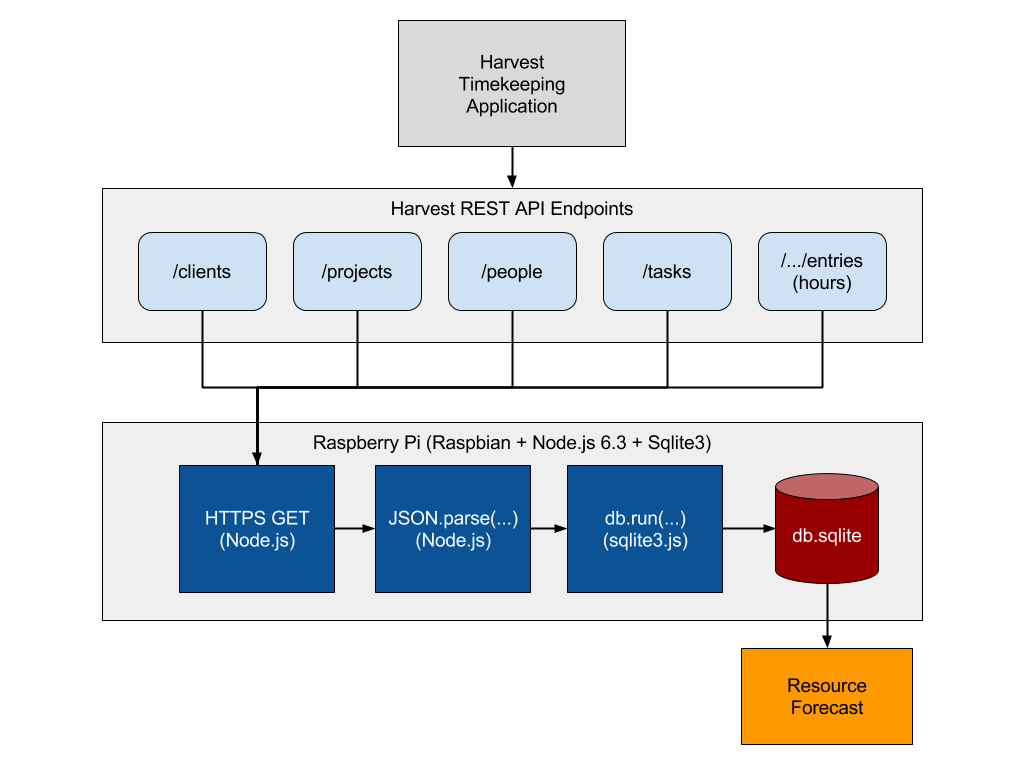
I actually built this solution twice. The first time I built it using an OEL VM with Oracle APEX 5.0.3 running on Oracle database XE. I used PL/SQL packages to parse the data into relational tables. Both solutions work however, the Node.js solution is a bit more flexible since it runs on Windows, Linux, OSX (and the Raspberry Pi!) and does not require a specific database.
Getting Started
If you already have a working Raspberry Pi 3 running Raspbian you can skip ahead. If you don't have a Raspberry Pi to work with you can still follow along, however, you need to adjust your steps for your own operating system and Node.js version(s). You can get an older version of the Raspberry Pi but I recommend a Raspberry Pi 3 B. I picked up 2 Vilros starter kits and so far they have been awesome. The Pi 3 B incorporates Bluetooth and WiFi so you won't need an adapter for wireless connections.
NB: You can get a manufacturer default / retail Micro SD card like this one but keep in mind you will have to go through some extra steps to get it ready for the Pi since it will not yet include the operating system or boot loader. If you pick up a starter kit the Micro SD card it comes with should already have the NOOBS boot loader and operating system installed and be ready to go.
Once you have a Raspberry Pi up and running you will need to install some software on it. When I setup my Pi for this use case I referenced this excellent post to get up and running. In summary, you need to:
- Insert your Micro SD card into the Pi (assuming it already has NOOBS on it), connect your Pi to a USB keyboard and mouse (the wireless dongle type should be OK too if they are USB compatible devices), connect your Pi to a TV and plug it in to a power source. (If this is your first time loading NOOBS then select the Raspbian OS from the boot loader and follow the prompts.)
- On the Raspberry Pi desktop, open a terminal and run
sudo raspi-configto: - Set your Raspberry Pi hostname (
9 Advanced Options -> A2...) - Configure your regional options (
5 Internationalisation Options -> I1..., I2..., and I3...) - Optionally expand the file system (
1 Expand Filesystem) -- If you installed from NOOBS setup this has likely already been done - On the Raspbian desktop configure your Wifi network
- Open a terminal and confirm your Internet connection is working (It seemed to take my Pi a few minutes to find DNS, or I did something wrong the first time...)
ping google.com- Update your OS software packages
sudo apt-get updatesudo apt-get dist-upgrade- Optionally, install XRDP and then Samba to allow your Pi hostname to be seen on the network (Note: if you are connecting to your Pi from OSX you will probably need to add
.localto your hostname to connect to the Pi as in:mypi.local) sudo apt-get -y install xrdpsudo apt-get -y install samba
Note: When logging into the Raspberry Pi over RDP using Microsoft Remote Desktop Client, don't try to add a domain. If you add a domain such as 'domain\user' you may cause xrdp to just show a black screen.
Install Node.js on Your Pi
Now that you have your Raspberry Pi basic setup complete you should be able to move on to installing Node.js. Connect to your Pi and open a terminal to complete the following:
- Add the NodeSource repository so that we can install Node.js 6. (If you want to run older versions of Node.js you can find the available
setup_...options here. I recommend either 4.x or 6.x at this point.) curl -sL https://deb.nodesource.com/setup_6.x | sudo -E bash -- Install Node.js (you need to complete the previous step first)
sudo apt-get install -y nodejs- Confirm you have Node.js installed and working by running
node --versionfrom the terminal. You should see something like the following.
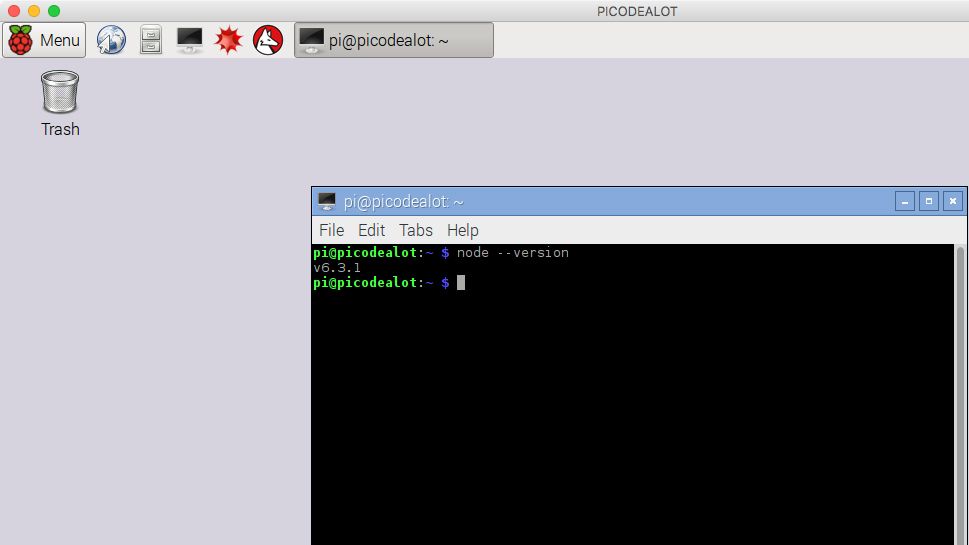
If you are new to Node.js then head over to nodejs.org and check it out. You will see sample code below but I recommend you dig into Node.js and play around on your own as well.
Install SQLite3 on your Pi
Now that we have Node.js installed lets move on to get a database installed on the Pi. You can use any database you can get running on the Pi (MySQL for example) however, I chose SQLite so that I can transport the database files and to keep my use case as simple as possible.
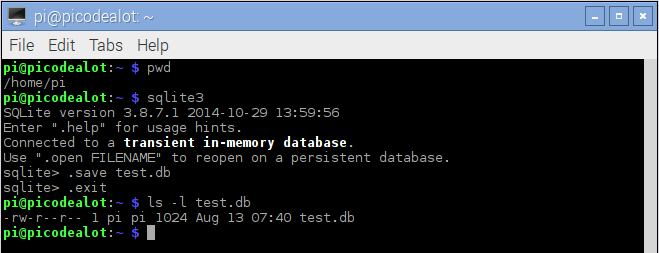
- Now that you have completed the above setup you will need to connect to your Pi (use SSH, RDP or connect the Pi directly to a monitor as before)
- From a terminal install SQLite3 on your Pi
sudo apt-get install -y sqlite3- Test the software is working OK
sqlite3.save test.db.exit
This should create an empty SQLite3 database file called test.db in your current working directory. You can delete this file if you don't need it anymore.
Use Case Step 1: Download JSON Data
Unless noted otherwise, for the rest of this post I assume you are connected to your Raspberry Pi over SSH or on a terminal session on the Pi desktop directly or via RDP.
We are finally ready to setup our Node.js project! Using HTTP calls we will pull JSON data from a RESTful web service and load it into a SQLite3 database. Remember that my use case was for downloading data from Harvest however we will just use a generic web service that is publicly accessible.
- Create a new folder where you will contain all of the project files and change to it. I called my folder
json2sql.
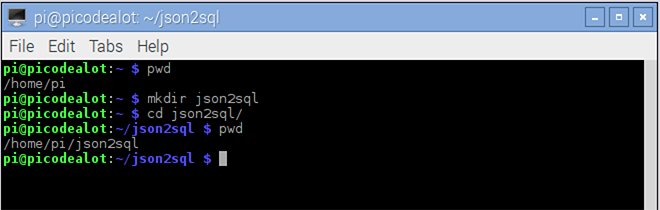
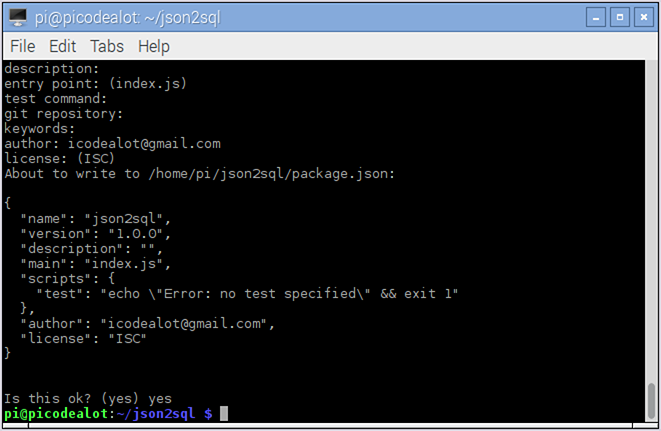
- Use Node Package Manager (npm) to initialize a default
package.jsonfile by runningnpm init. Press Enter through the prompts and enter an email address if you like.
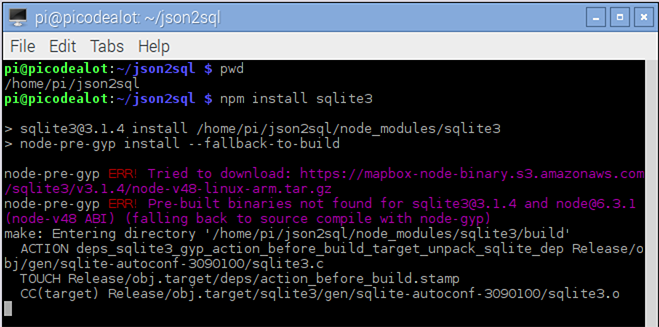
- Use
npmto install the sqlite3 Node.js package by runningnpm install sqlite3. This will create sub-folder callednode_modules. You may see someERR:...failures (this is OK) but NPM should default to compiling sqlite3 dependencies from source which will take several minutes.
This will allow us to import the sqlite3 module into our Node.js application so that we can create tables, insert data and run SQL statements against our database. For the next step we will use a generic RESTful service to download a list of TODO items as JSON found at: https://jsonplaceholder.typicode.com/todos
- Create a new Javascript file called
get_data.jsin your project folder and add the following code. This will get Node.js to make an HTTPS call to download this data from the URL specified.
var https  = require('https');

var data = '';
var url  = 'https://jsonplaceholder.typicode.com/todos';

var req = https.request(url, (res) => {

  res.on('data', (d) => {
    data += d;
  });

  res.on('end', () => {
    var json = JSON.parse(data);
    console.log(JSON.stringify(json, null, 4));
  });

});
req.end();
This code will download a list of tasks from the web service in JSON format and print it to the console. It should have the following structure:
[
  {
    "userId": 1,
    "id": 1,
    "title": "delectus aut autem",
    "completed": false
  },...
]
Note: This web service happens to be setup to return JSON data by default. You may find other web services are looking for HTTP request headers (or query strings in the URL) to indicate that you would like JSON data in response. HTTP headers are straight forward to setup if you supply a configuration object similar to the following instead of calling the URL directly.
var config = {
  hostname: '[hostname]',
  port: 443,
  method: 'GET',
  path: '/[rest endpoint]',
  headers: {
    "Content-Type": "application/json",
    "Accept": "application/json"
  }
};

var req = https.request(config, function (res) {
  ...
});
Use Case Step 2: Parse JSON into SQL Tables
Building on the example above we can now take the next step of parsing the JSON data into relational tables. There are many ways to do anything in Javascript. I don't claim this is the best or most efficient way, but for a proof of concept it works great. Also note, the structure of your JSON may result in nested objects. You would need to account for this in your own code if your JSON resulted in nested objects.
This example assumes each object returned has a single layer of key/value pairs as shown previously.
- First we need to add a new function to our Node.js program.
create_table(...)that will deal with creating the table and also insert the records for each JSON object.
/*
  Create the table and insert the values from each JSON object.
*/
function create_table(json) {

  // hard coding is cheating, mostly... make it dynamic!

  db.serialize( () => {
    db.run('create table if not exists '
          + 'todo ('
          + 'id numeric primary key, '
          + 'userid numeric, '
          + 'title text, '
          + 'completed text)');

    db.run('delete from todo'); //or drop the table first..

    var stmt = db.prepare('insert into todo values (?,?,?,?)');

    json.forEach( (item) => {
      stmt.run([item.id, item.userid, item.title, item.completed]);
    });

    stmt.finalize();

  });

}
NB: This is a "dumb" implementation in that there is really no error checking. Also, the columns are hard-coded. This can be made dynamic with a little more work on the JSON parsing front.
- Finally we need to update our module require statements and the main HTTPS request block to incorporate this
create_table(...)function after the data is retrieved from the RESTful web service. While we are at it we'll go ahead and add aselectstatement to confirm that we are getting data into the table.
var https   = require('https');
var sqlite3 = require('sqlite3').verbose();

var db   = new sqlite3.Database('./test.db');
var url  = 'https://jsonplaceholder.typicode.com/todos';
var data = '';

/*
  Make an HTTPS request to the RESTful web service
*/
var req = https.request(url, (res) => {

  res.on('data', (d) => {
    data += d;
  });

  res.on('end', () => {
    var json = JSON.parse(data);

    create_table(json);

    /*
      verify the data made it into the table
    */
    db.each('select rowid, title '
          + 'from todo '
          + 'order by rowid asc', (err, row) => {
      console.log(row.rowid + ': ' + row.title);
    });
  });

});
req.end();
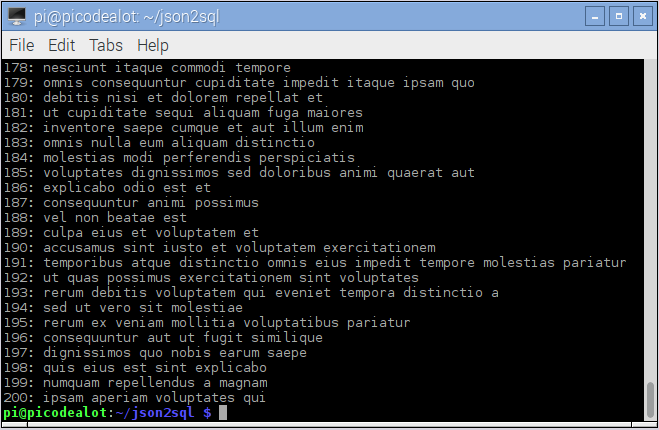
With that we should now see data being downloaded and inserted into our table when we run node get_data.js. The select statement at the end is just for testing / proof that we actually got the data into our table and you should see something like this on your Pi terminal.
Keep in mind: this is a simplified example. The RESTful web service I am using in this example is not under my control and they have some rate limiting that may cause you errors along the way if you call their service too frequently.
Now that we have the data in a relational database we can go anywhere with it including other business processes or tools that can read from our relational database via SQL statements. For the final step in my use case, I am doing some mapping / ETL and loading data into another internal application. Hopefully you found something useful here and this helps you along the way.
Cheers!
Sample code @ https://github.com/icodealot/picodealot